Introduction
Over the past few years I have been an on again, off again KDE hacker. Sadly my schedule has not permitted me to spend as much time hacking KDE as I would like. However, not too long ago, I added a small feature to KMail to make SSH tunneling fairly simple. I am finally getting around to writing a guide on how to use the feature for what I intended, SSH tunneling.
It is widely known that POP3 is a very insecure protocol, since it is a plain text protocol that transmits passwords and usernames with no protection. Anyone on a private network can quickly sniff packets and determine all the passwords used on the network. Although advances in POP3 authentication have surfaced (APOP, SSL, etc.) many servers still use the old plain text format.
SSH tunneling is the process of establishing a secure, encrypted tunnel between you and the mail host. This tunnel can be used for anything, but by using the Precommand feature of KMail, I will show you how to use a tunnel for POP3 and SMTP.
This guide is written for KDE 3.1, but KDE 3.0 also supports the Precommand feature and most of the configuration options are similar.
Prerequisites
- A working internet connection so we can test things out as we go.
- SSH installed and working. This means you can successfully connect to the mail server using SSH. Not all mail servers will allow an SSH connection to the server, so be sure to check that this works. If you are running your own mail server, most (a.f.a.i.k. all) distributions provide SSH packages.
- You must have SSH configured to do RSA/DSA authentication to the server. This is a somewhat complex topic so I will not cover it here.If you do not already have this setup, follow this link to an IBM developerWorks article on the topic. Once it is configured, return to this article and continue.
Shell Scripts
Some simple shell scripts will be required to establish the tunnel. The scripts use the -L command line option on SSH to establish the tunnel. There are two scripts involved. The first script is used to establish a tunnel for a POP3 connection on port 110 of the mail server and the second script is used to establish a tunnel for a SMTP connection on port 25.Download each script and make them executable, chmod u+x sshpopportforward.sh sshsmtpportforward.sh. Open each script in an editor (kwrite), and edit the variables SSH_USERNAME and SSH_SERVER. The username should be the username that you use to open an ssh connection to the mail server. This may not be the same as your POP3 or SMTP username. The mail server is the domain name (or IP) of your mail server. For now, it is assumed that the mail server is running the SSH daemon.
Once this is done, you should be able to run the command sshpopportforward.sh ; telnet localhost 11110. If everything is setup correctly, you should see a response from the POP server, like: "+OK QPOP (version ?) at mail.fakehost.com". Type QUIT to disconnect from the mail server.
Ok, so what do the scripts do? Both scripts are identical, except that they use different port numbers (for SMTP and POP). The script runs a single SSH command: ssh -C -f $SSH_USERNAME@$SSH_SERVER -L 11110:$SSH_MAIL_SERVER:110 'sleep 3'; sleep 1. This command does a few things. First, it instructs SSH to connect to $SSH_SERVER as user $SSH_USERNAME. Once connected, it tells SSH to open port 11110 on the local machine (localhost). Any connections to 11110 should then be forwarded (through the SSH connection) to port 110 on $SSH_MAIL_SERVER. After setting up the ports, the script tells SSH to run the command sleep 3 on the remote mail server. This ensures that the tunnel will remain open long enough for KMail to actively start using it. Once a connection is established through the tunnel, SSH will keep the tunnel open until the connection is closed. This ensures that the tunnel will remain valid even if it takes more than 3 seconds to download your mail from the server.
Configuring KMail
Now that we have a working connection to the mail server and can establish an SSH tunnel, we can configure KMail to use this tunnel.| To begin, launch KMail.
Open the configuration dialog by clicking Settings->Configure KMail. Click
on the second icon in the configuration dialog, the Network settings. You should see the
dialog pictured. |
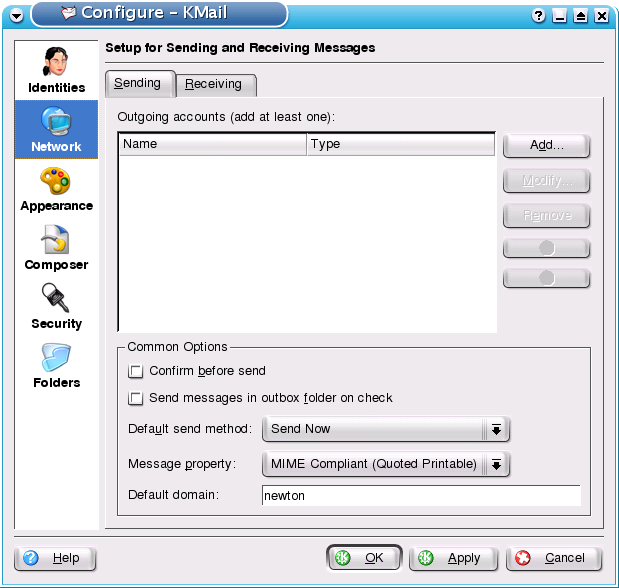 (Click to Enlarge) |
 (Click to Enlarge) |
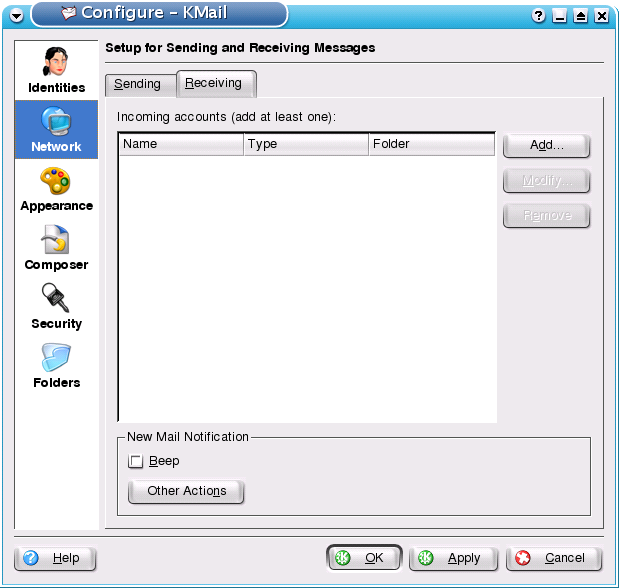
We will be adding a new
POP3 account first, so you will need to edit the Receiving settings.
Click the tab labeled Receiving.
Your dialog should look like the one picture. |
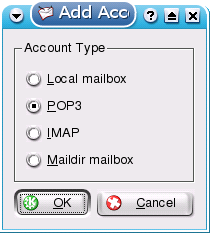
| Add a new account by
clicking on the Add button. The
new account type dialog should appear, as is pictured. Choose a POP3
account and click OK. |
 (Click to Enlarge) |
 (Click to Enlarge) |
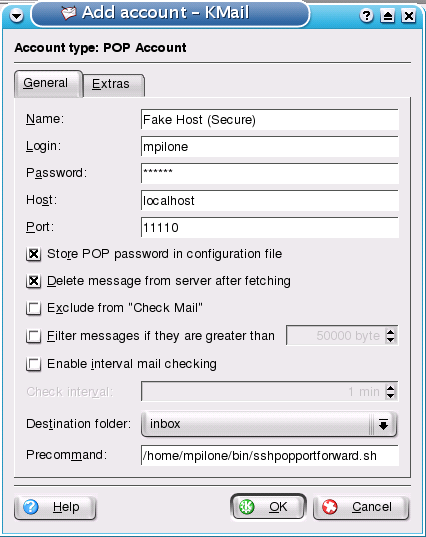
The new account dialog
should appear. This dialog will allow you to enter your settings for the
POP3 connection. Fill in the fields of the dialog with the
following information:
You do not have to edit any of the fields on the extras tab. Click OK to confirm the settings. |
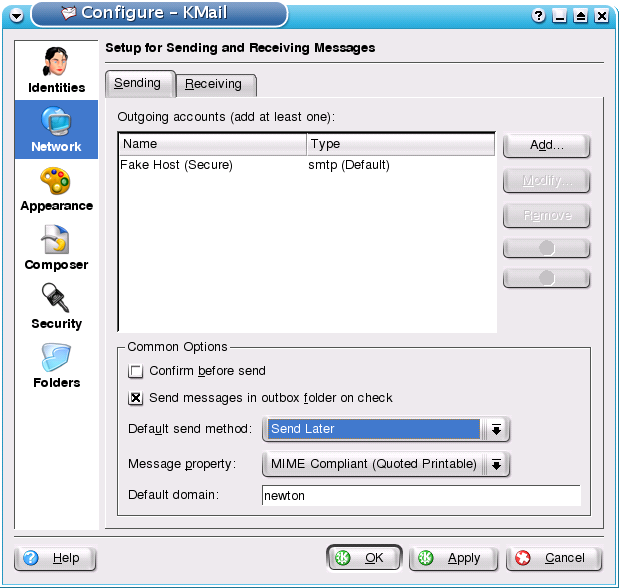
| Now we will setup the SMTP
connection for sending mail. Since most SMTP servers do not require a
password, tunneling this connection is not as important. However, I like
to know that my out going mail cannot be sniffed between me and my mail
server. Also, I'll cover a few reasons at the end of this article for
why this may be useful. Click on the Sending tab of the Network settings in the configuration dialog. You should see the settings pictured. |
 (Click to Enlarge) |
 (Click to Enlarge) |
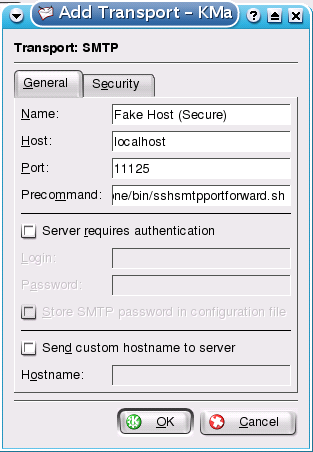
Click
the Add buttonand choose SMTP as
the transport type. Click the OK
button. You should now see the SMTP settings dialog pictured. Fill
in the fields of the dialog with the following information:
You do not have to edit any of the fields on the security tab. Click OK to confirm the settings. |
| Finally, on the Sending
settings tab, you may optionally want to change the Default Send Method to be Send Later and check the box Send messages in outbox folder on check. Since the SSH connection and tunnel needs to be established each time a mail is sent, queueing the mail (sending later) will allow you to respond to many emails, then send them all through a single tunnel. This will speed up overall KMail usage. This is definately not required, but may be useful. The checkbox helps ensure that you don't forget to send any queued mail, since it will be sent the next time you check your mail (and you do check it often, right?). The final settings should look like the ones pictured. Click OK to accept the new settings. |
 (Click to Enlarge) |
Thats it. KMail is now configured to use the tunnel. Next time you check your mail KMail will first run the precommands, which establish the tunnels, then check the mail through the tunnel. As I mentioned in the beginning of the article, you need to setup SSH for DSA/RSA for full functionality.
Limitation/Problems
One major problem with this approach is that it opens ports 11110 and 111125 on the local machine while checking mail. For most people this is not a problem, but if you are on a multiuser machine or a public network, be sure to protect the ports with a firewall so only localhost can connect to them.It has been reported that some mail servers do not allow outgoing SMTP connections from the localhost. This is required if you want to use the SMTP tunnelling method described above. Bill Farrow suggested a workaround to this problem. Check out this page for details on using the SSH sendmail option for SMTP.
Extensions and Other Uses
As with all good things, there is more than just this simple use for tunneling that I discribed above. SSH is able to setup a tunnel from the remote machine, to the SSH machine, to another machine. Using this, you can use an SSH to connect to one machine, then forward to a different machine. This can be extremely useful if you are going through a corporate firewall to your mail server. Open an SSH tunnel through the firewall, then forward it behind the firewall to the mail server. This allows a company to run a POP3 mail server but not have to expose it to the public. A very easy and free VPN solution. So when your boss tells you to find a good VPN solution, show him SSH and fish://!We tunneled the SMTP connection even though I said there is normally no password authentication on an SMTP server. So, whats the point? Well, most good SMTP mail servers will not allow relaying in order to prevent unauthorized users from sending mail through the server. This can sometimes cause problems when employees at home need to send email. Rather than implementing a SMTP after POP or static IP authentication list, SSH tunnel inside the firewall, then send the mail from that machine. This will make the mail server think the connection is coming from an authorized machine (which it is) and allow you to send email from anyplace.
It should be noted that SSH tunneling in KMail can be done without the use of the scripts, by simply placing the SSH command in the Precommand fields. For ease of editing and clarity, the scripts are separate in this example. Also, if you have multiple POP3 accounts or servers, you can just create a copy of the script for each account, or modify the script to take a server as a command line argument.
This article is just a brief introduction into the wonderful world of tunneling, and the ideas can be used for everything from VNC connections to CVS access. For more information, checkout the links below.
Links
Using SSH sendmail instead of SSH tunneling the SMTP connection: http://www.slac.com/~mpilone/projects/kde/kmailssh/sshsendmail.htmlKDE: http://www.kde.org
KMail: http://pim.kde.org/components/kmail.php
OpenSSH: http://www.openssh.com/
IBM DeveloperWorks OpenSSH Key Management: http://www-106.ibm.com/developerworks/linux/library/l-keyc.html
Acknowledgments
Dan Pilone for the original scripts.Bill Farrow for the SSH sendmail suggestion and script.
The KDE project and all the developers, translaters, artists, etc. involved.
Comments are welcome at mpilone@slac.com.
Author: Mike Pilone, homepage
Created: 02/17/03
Last updated: 04/30/03